google3c8452e124cb77db

Senin, 15 Agustus 2016

Writing your first Django app, part 4

Write a simple form

Let’s update our poll detail template (“polls/detail.html”) from the last tutorial, so that the template contains an HTML <form> element:
polls/templates/polls/detail.html
<h1>{{ question.question_text }}</h1>

{% if error_message %}<p><strong>{{ error_message }}</strong></p>{% endif %}

<form action="{% url 'polls:vote' question.id %}" method="post">
{% csrf_token %}
{% for choice in question.choice_set.all %}
    <input type="radio" name="choice" id="choice{{ forloop.counter }}" value="{{ choice.id }}" />
    <label for="choice{{ forloop.counter }}">{{ choice.choice_text }}</label><br />
{% endfor %}
<input type="submit" value="Vote" />
</form>
A quick rundown:
  • The above template displays a radio button for each question choice. The value of each radio button is the associated question choice’s ID. The name of each radio button is "choice". That means, when somebody selects one of the radio buttons and submits the form, it’ll send the POST data choice=# where # is the ID of the selected choice. This is the basic concept of HTML forms.
  • We set the form’s action to {% url 'polls:vote' question.id %}, and we set method="post". Using method="post" (as opposed to method="get") is very important, because the act of submitting this form will alter data server-side. Whenever you create a form that alters data server-side, use method="post". This tip isn’t specific to Django; it’s just good Web development practice.
  • forloop.counter indicates how many times the for tag has gone through its loop
  • Since we’re creating a POST form (which can have the effect of modifying data), we need to worry about Cross Site Request Forgeries. Thankfully, you don’t have to worry too hard, because Django comes with a very easy-to-use system for protecting against it. In short, all POST forms that are targeted at internal URLs should use the {% csrf_token %} template tag.
Now, let’s create a Django view that handles the submitted data and does something with it. Remember, in Tutorial 3, we created a URLconf for the polls application that includes this line:
polls/urls.py
url(r'^(?P<question_id>[0-9]+)/vote/$', views.vote, name='vote'),
We also created a dummy implementation of the vote() function. Let’s create a real version. Add the following to polls/views.py:
polls/views.py
from django.shortcuts import get_object_or_404, render
from django.http import HttpResponseRedirect, HttpResponse
from django.urls import reverse

from .models import Choice, Question
# ...
def vote(request, question_id):
    question = get_object_or_404(Question, pk=question_id)
    try:
        selected_choice = question.choice_set.get(pk=request.POST['choice'])
    except (KeyError, Choice.DoesNotExist):
        # Redisplay the question voting form.
        return render(request, 'polls/detail.html', {
            'question': question,
            'error_message': "You didn't select a choice.",
        })
    else:
        selected_choice.votes += 1
        selected_choice.save()
        # Always return an HttpResponseRedirect after successfully dealing
        # with POST data. This prevents data from being posted twice if a
        # user hits the Back button.
        return HttpResponseRedirect(reverse('polls:results', args=(question.id,)))
This code includes a few things we haven’t covered yet in this tutorial:
  • request.POST is a dictionary-like object that lets you access submitted data by key name. In this case, request.POST['choice'] returns the ID of the selected choice, as a string. request.POST values are always strings.
    Note that Django also provides request.GET for accessing GET data in the same way – but we’re explicitly using request.POST in our code, to ensure that data is only altered via a POST call.
  • request.POST['choice'] will raise KeyError if choice wasn’t provided in POST data. The above code checks for KeyError and redisplays the question form with an error message if choice isn’t given.
  • After incrementing the choice count, the code returns an HttpResponseRedirect rather than a normal HttpResponse. HttpResponseRedirect takes a single argument: the URL to which the user will be redirected (see the following point for how we construct the URL in this case).
    As the Python comment above points out, you should always return an HttpResponseRedirect after successfully dealing with POST data. This tip isn’t specific to Django; it’s just good Web development practice.
  • We are using the reverse() function in the HttpResponseRedirect constructor in this example. This function helps avoid having to hardcode a URL in the view function. It is given the name of the view that we want to pass control to and the variable portion of the URL pattern that points to that view. In this case, using the URLconf we set up in Tutorial 3, this reverse() call will return a string like
    '/polls/3/results/'
    
    where the 3 is the value of question.id. This redirected URL will then call the 'results' view to display the final page.
As mentioned in Tutorial 3, request is an HttpRequest object. For more on HttpRequest objects, see the request and response documentation.
After somebody votes in a question, the vote() view redirects to the results page for the question. Let’s write that view:
polls/views.py
from django.shortcuts import get_object_or_404, render


def results(request, question_id):
    question = get_object_or_404(Question, pk=question_id)
    return render(request, 'polls/results.html', {'question': question})
This is almost exactly the same as the detail() view from Tutorial 3. The only difference is the template name. We’ll fix this redundancy later.
Now, create a polls/results.html template:
polls/templates/polls/results.html
<h1>{{ question.question_text }}</h1>

<ul>
{% for choice in question.choice_set.all %}
    <li>{{ choice.choice_text }} -- {{ choice.votes }} vote{{ choice.votes|pluralize }}</li>
{% endfor %}
</ul>

<a href="{% url 'polls:detail' question.id %}">Vote again?</a>
Now, go to /polls/1/ in your browser and vote in the question. You should see a results page that gets updated each time you vote. If you submit the form without having chosen a choice, you should see the error message.
Note
The code for our vote() view does have a small problem. It first gets the selected_choice object from the database, then computes the new value of votes, and then saves it back to the database. If two users of your website try to vote at exactly the same time, this might go wrong: The same value, let’s say 42, will be retrieved for votes. Then, for both users the new value of 43 is computed and saved, but 44 would be the expected value.
This is called a race condition. If you are interested, you can read Avoiding race conditions using F() to learn how you can solve this issue.

Use generic views: Less code is better

The detail() (from Tutorial 3) and results() views are very simple – and, as mentioned above, redundant. The index() view, which displays a list of polls, is similar.
These views represent a common case of basic Web development: getting data from the database according to a parameter passed in the URL, loading a template and returning the rendered template. Because this is so common, Django provides a shortcut, called the “generic views” system.
Generic views abstract common patterns to the point where you don’t even need to write Python code to write an app.
Let’s convert our poll app to use the generic views system, so we can delete a bunch of our own code. We’ll just have to take a few steps to make the conversion. We will:
  1. Convert the URLconf.
  2. Delete some of the old, unneeded views.
  3. Introduce new views based on Django’s generic views.
Read on for details.
Why the code-shuffle?
Generally, when writing a Django app, you’ll evaluate whether generic views are a good fit for your problem, and you’ll use them from the beginning, rather than refactoring your code halfway through. But this tutorial intentionally has focused on writing the views “the hard way” until now, to focus on core concepts.
You should know basic math before you start using a calculator.

Amend URLconf

First, open the polls/urls.py URLconf and change it like so:
polls/urls.py
from django.conf.urls import url

from . import views

app_name = 'polls'
urlpatterns = [
    url(r'^$', views.IndexView.as_view(), name='index'),
    url(r'^(?P<pk>[0-9]+)/$', views.DetailView.as_view(), name='detail'),
    url(r'^(?P<pk>[0-9]+)/results/$', views.ResultsView.as_view(), name='results'),
    url(r'^(?P<question_id>[0-9]+)/vote/$', views.vote, name='vote'),
]
Note that the name of the matched pattern in the regexes of the second and third patterns has changed from <question_id> to <pk>.

Amend views

Next, we’re going to remove our old index, detail, and results views and use Django’s generic views instead. To do so, open the polls/views.py file and change it like so:
polls/views.py
from django.shortcuts import get_object_or_404, render
from django.http import HttpResponseRedirect
from django.urls import reverse
from django.views import generic

from .models import Choice, Question


class IndexView(generic.ListView):
    template_name = 'polls/index.html'
    context_object_name = 'latest_question_list'

    def get_queryset(self):
        """Return the last five published questions."""
        return Question.objects.order_by('-pub_date')[:5]


class DetailView(generic.DetailView):
    model = Question
    template_name = 'polls/detail.html'


class ResultsView(generic.DetailView):
    model = Question
    template_name = 'polls/results.html'


def vote(request, question_id):
    ... # same as above, no changes needed.
We’re using two generic views here: ListView and DetailView. Respectively, those two views abstract the concepts of “display a list of objects” and “display a detail page for a particular type of object.”
  • Each generic view needs to know what model it will be acting upon. This is provided using the model attribute.
  • The DetailView generic view expects the primary key value captured from the URL to be called "pk", so we’ve changed question_id to pk for the generic views.
By default, the DetailView generic view uses a template called <app name>/<model name>_detail.html. In our case, it would use the template "polls/question_detail.html". The template_name attribute is used to tell Django to use a specific template name instead of the autogenerated default template name. We also specify the template_name for the results list view – this ensures that the results view and the detail view have a different appearance when rendered, even though they’re both a DetailView behind the scenes.
Similarly, the ListView generic view uses a default template called <app name>/<model name>_list.html; we use template_name to tell ListView to use our existing "polls/index.html" template.
In previous parts of the tutorial, the templates have been provided with a context that contains the question and latest_question_list context variables. For DetailView the question variable is provided automatically – since we’re using a Django model (Question), Django is able to determine an appropriate name for the context variable. However, for ListView, the automatically generated context variable is question_list. To override this we provide the context_object_name attribute, specifying that we want to use latest_question_list instead. As an alternative approach, you could change your templates to match the new default context variables – but it’s a lot easier to just tell Django to use the variable you want.
Run the server, and use your new polling app based on generic views.
For full details on generic views, see the generic views documentation.
When you’re comfortable with forms and generic views, read part 5 of this tutorial to learn about testing our polls app.

Source : https://docs.djangoproject.com/en/1.10/intro/tutorial04/

Writing your first Django app, part 3

Overview

A view is a “type” of Web page in your Django application that generally serves a specific function and has a specific template. For example, in a blog application, you might have the following views:
  • Blog homepage – displays the latest few entries.
  • Entry “detail” page – permalink page for a single entry.
  • Year-based archive page – displays all months with entries in the given year.
  • Month-based archive page – displays all days with entries in the given month.
  • Day-based archive page – displays all entries in the given day.
  • Comment action – handles posting comments to a given entry.
In our poll application, we’ll have the following four views:
  • Question “index” page – displays the latest few questions.
  • Question “detail” page – displays a question text, with no results but with a form to vote.
  • Question “results” page – displays results for a particular question.
  • Vote action – handles voting for a particular choice in a particular question.
In Django, web pages and other content are delivered by views. Each view is represented by a simple Python function (or method, in the case of class-based views). Django will choose a view by examining the URL that’s requested (to be precise, the part of the URL after the domain name).
Now in your time on the web you may have come across such beauties as “ME2/Sites/dirmod.asp?sid=&type=gen&mod=Core+Pages&gid=A6CD4967199A42D9B65B1B”. You will be pleased to know that Django allows us much more elegant URL patterns than that.
A URL pattern is simply the general form of a URL - for example: /newsarchive/<year>/<month>/.
To get from a URL to a view, Django uses what are known as ‘URLconfs’. A URLconf maps URL patterns (described as regular expressions) to views.
This tutorial provides basic instruction in the use of URLconfs, and you can refer to django.urls for more information.

Writing more views

Now let’s add a few more views to polls/views.py. These views are slightly different, because they take an argument:
polls/views.py
def detail(request, question_id):
    return HttpResponse("You're looking at question %s." % question_id)

def results(request, question_id):
    response = "You're looking at the results of question %s."
    return HttpResponse(response % question_id)

def vote(request, question_id):
    return HttpResponse("You're voting on question %s." % question_id)
Wire these new views into the polls.urls module by adding the following url() calls:
polls/urls.py
from django.conf.urls import url

from . import views

urlpatterns = [
    # ex: /polls/
    url(r'^$', views.index, name='index'),
    # ex: /polls/5/
    url(r'^(?P<question_id>[0-9]+)/$', views.detail, name='detail'),
    # ex: /polls/5/results/
    url(r'^(?P<question_id>[0-9]+)/results/$', views.results, name='results'),
    # ex: /polls/5/vote/
    url(r'^(?P<question_id>[0-9]+)/vote/$', views.vote, name='vote'),
]
Take a look in your browser, at “/polls/34/”. It’ll run the detail() method and display whatever ID you provide in the URL. Try “/polls/34/results/” and “/polls/34/vote/” too – these will display the placeholder results and voting pages.
When somebody requests a page from your website – say, “/polls/34/”, Django will load the mysite.urls Python module because it’s pointed to by the ROOT_URLCONF setting. It finds the variable named urlpatterns and traverses the regular expressions in order. After finding the match at '^polls/', it strips off the matching text ("polls/") and sends the remaining text – "34/" – to the ‘polls.urls’ URLconf for further processing. There it matches r'^(?P<question_id>[0-9]+)/$', resulting in a call to the detail() view like so:
detail(request=<HttpRequest object>, question_id='34')
The question_id='34' part comes from (?P<question_id>[0-9]+). Using parentheses around a pattern “captures” the text matched by that pattern and sends it as an argument to the view function; ?P<question_id> defines the name that will be used to identify the matched pattern; and [0-9]+ is a regular expression to match a sequence of digits (i.e., a number).
Because the URL patterns are regular expressions, there really is no limit on what you can do with them. And there’s no need to add URL cruft such as .html – unless you want to, in which case you can do something like this:
url(r'^polls/latest\.html$', views.index),
But, don’t do that. It’s silly.

Write views that actually do something

Each view is responsible for doing one of two things: returning an HttpResponse object containing the content for the requested page, or raising an exception such as Http404. The rest is up to you.
Your view can read records from a database, or not. It can use a template system such as Django’s – or a third-party Python template system – or not. It can generate a PDF file, output XML, create a ZIP file on the fly, anything you want, using whatever Python libraries you want.
All Django wants is that HttpResponse. Or an exception.
Because it’s convenient, let’s use Django’s own database API, which we covered in Tutorial 2. Here’s one stab at a new index() view, which displays the latest 5 poll questions in the system, separated by commas, according to publication date:
polls/views.py
from django.http import HttpResponse

from .models import Question


def index(request):
    latest_question_list = Question.objects.order_by('-pub_date')[:5]
    output = ', '.join([q.question_text for q in latest_question_list])
    return HttpResponse(output)

# Leave the rest of the views (detail, results, vote) unchanged
There’s a problem here, though: the page’s design is hard-coded in the view. If you want to change the way the page looks, you’ll have to edit this Python code. So let’s use Django’s template system to separate the design from Python by creating a template that the view can use.
First, create a directory called templates in your polls directory. Django will look for templates in there.
Your project’s TEMPLATES setting describes how Django will load and render templates. The default settings file configures a DjangoTemplates backend whose APP_DIRS option is set to True. By convention DjangoTemplates looks for a “templates” subdirectory in each of the INSTALLED_APPS.
Within the templates directory you have just created, create another directory called polls, and within that create a file called index.html. In other words, your template should be at polls/templates/polls/index.html. Because of how the app_directories template loader works as described above, you can refer to this template within Django simply as polls/index.html.
Template namespacing
Now we might be able to get away with putting our templates directly in polls/templates (rather than creating another polls subdirectory), but it would actually be a bad idea. Django will choose the first template it finds whose name matches, and if you had a template with the same name in a different application, Django would be unable to distinguish between them. We need to be able to point Django at the right one, and the easiest way to ensure this is by namespacing them. That is, by putting those templates inside another directory named for the application itself.
Put the following code in that template:
polls/templates/polls/index.html
{% if latest_question_list %}
    <ul>
    {% for question in latest_question_list %}
        <li><a href="/polls/{{ question.id }}/">{{ question.question_text }}</a></li>
    {% endfor %}
    </ul>
{% else %}
    <p>No polls are available.</p>
{% endif %}
Now let’s update our index view in polls/views.py to use the template:
polls/views.py
from django.http import HttpResponse
from django.template import loader

from .models import Question


def index(request):
    latest_question_list = Question.objects.order_by('-pub_date')[:5]
    template = loader.get_template('polls/index.html')
    context = {
        'latest_question_list': latest_question_list,
    }
    return HttpResponse(template.render(context, request))
That code loads the template called polls/index.html and passes it a context. The context is a dictionary mapping template variable names to Python objects.
Load the page by pointing your browser at “/polls/”, and you should see a bulleted-list containing the “What’s up” question from Tutorial 2. The link points to the question’s detail page.

A shortcut: render()

It’s a very common idiom to load a template, fill a context and return an HttpResponse object with the result of the rendered template. Django provides a shortcut. Here’s the full index() view, rewritten:
polls/views.py
from django.shortcuts import render

from .models import Question


def index(request):
    latest_question_list = Question.objects.order_by('-pub_date')[:5]
    context = {'latest_question_list': latest_question_list}
    return render(request, 'polls/index.html', context)
Note that once we’ve done this in all these views, we no longer need to import loader and HttpResponse (you’ll want to keep HttpResponse if you still have the stub methods for detail, results, and vote).
The render() function takes the request object as its first argument, a template name as its second argument and a dictionary as its optional third argument. It returns an HttpResponse object of the given template rendered with the given context.

Raising a 404 error

Now, let’s tackle the question detail view – the page that displays the question text for a given poll. Here’s the view:
polls/views.py
from django.http import Http404
from django.shortcuts import render

from .models import Question
# ...
def detail(request, question_id):
    try:
        question = Question.objects.get(pk=question_id)
    except Question.DoesNotExist:
        raise Http404("Question does not exist")
    return render(request, 'polls/detail.html', {'question': question})
The new concept here: The view raises the Http404 exception if a question with the requested ID doesn’t exist.
We’ll discuss what you could put in that polls/detail.html template a bit later, but if you’d like to quickly get the above example working, a file containing just:
polls/templates/polls/detail.html
{{ question }}
will get you started for now.

A shortcut: get_object_or_404()

It’s a very common idiom to use get() and raise Http404 if the object doesn’t exist. Django provides a shortcut. Here’s the detail() view, rewritten:
polls/views.py
from django.shortcuts import get_object_or_404, render

from .models import Question
# ...
def detail(request, question_id):
    question = get_object_or_404(Question, pk=question_id)
    return render(request, 'polls/detail.html', {'question': question})
The get_object_or_404() function takes a Django model as its first argument and an arbitrary number of keyword arguments, which it passes to the get() function of the model’s manager. It raises Http404 if the object doesn’t exist.
Philosophy
Why do we use a helper function get_object_or_404() instead of automatically catching the ObjectDoesNotExist exceptions at a higher level, or having the model API raise Http404 instead of ObjectDoesNotExist?
Because that would couple the model layer to the view layer. One of the foremost design goals of Django is to maintain loose coupling. Some controlled coupling is introduced in the django.shortcuts module.
There’s also a get_list_or_404() function, which works just as get_object_or_404() – except using filter() instead of get(). It raises Http404 if the list is empty.

Use the template system

Back to the detail() view for our poll application. Given the context variable question, here’s what the polls/detail.html template might look like:
polls/templates/polls/detail.html
<h1>{{ question.question_text }}</h1>
<ul>
{% for choice in question.choice_set.all %}
    <li>{{ choice.choice_text }}</li>
{% endfor %}
</ul>
The template system uses dot-lookup syntax to access variable attributes. In the example of {{ question.question_text }}, first Django does a dictionary lookup on the object question. Failing that, it tries an attribute lookup – which works, in this case. If attribute lookup had failed, it would’ve tried a list-index lookup.
Method-calling happens in the {% for %} loop: question.choice_set.all is interpreted as the Python code question.choice_set.all(), which returns an iterable of Choice objects and is suitable for use in the {% for %} tag.
See the template guide for more about templates.

Removing hardcoded URLs in templates

Remember, when we wrote the link to a question in the polls/index.html template, the link was partially hardcoded like this:
<li><a href="/polls/{{ question.id }}/">{{ question.question_text }}</a></li>
The problem with this hardcoded, tightly-coupled approach is that it becomes challenging to change URLs on projects with a lot of templates. However, since you defined the name argument in the url() functions in the polls.urls module, you can remove a reliance on specific URL paths defined in your url configurations by using the {% url %} template tag:
<li><a href="{% url 'detail' question.id %}">{{ question.question_text }}</a></li>
The way this works is by looking up the URL definition as specified in the polls.urls module. You can see exactly where the URL name of ‘detail’ is defined below:
...
# the 'name' value as called by the {% url %} template tag
url(r'^(?P<question_id>[0-9]+)/$', views.detail, name='detail'),
...
If you want to change the URL of the polls detail view to something else, perhaps to something like polls/specifics/12/ instead of doing it in the template (or templates) you would change it in polls/urls.py:
...
# added the word 'specifics'
url(r'^specifics/(?P<question_id>[0-9]+)/$', views.detail, name='detail'),
...

Namespacing URL names

The tutorial project has just one app, polls. In real Django projects, there might be five, ten, twenty apps or more. How does Django differentiate the URL names between them? For example, the polls app has a detail view, and so might an app on the same project that is for a blog. How does one make it so that Django knows which app view to create for a url when using the {% url %} template tag?
The answer is to add namespaces to your URLconf. In the polls/urls.py file, go ahead and add an app_name to set the application namespace:
polls/urls.py
from django.conf.urls import url

from . import views

app_name = 'polls'
urlpatterns = [
    url(r'^$', views.index, name='index'),
    url(r'^(?P<question_id>[0-9]+)/$', views.detail, name='detail'),
    url(r'^(?P<question_id>[0-9]+)/results/$', views.results, name='results'),
    url(r'^(?P<question_id>[0-9]+)/vote/$', views.vote, name='vote'),
]
Now change your polls/index.html template from:
polls/templates/polls/index.html
<li><a href="{% url 'detail' question.id %}">{{ question.question_text }}</a></li>
to point at the namespaced detail view:
polls/templates/polls/index.html
<li><a href="{% url 'polls:detail' question.id %}">{{ question.question_text }}</a></li>
When you’re comfortable with writing views, read part 4 of this tutorial to learn about simple form processing and generic views.

Source : https://docs.djangoproject.com/en/1.10/intro/tutorial03/

Minggu, 14 Agustus 2016

Writing your first Django app, part 2

Database setup
Now, open up mysite/settings.py. It’s a normal Python module with module-level variables representing Django settings.
By default, the configuration uses SQLite. If you’re new to databases, or you’re just interested in trying Django, this is the easiest choice. SQLite is included in Python, so you won’t need to install anything else to support your database. When starting your first real project, however, you may want to use a more robust database like PostgreSQL, to avoid database-switching headaches down the road.
If you wish to use another database, install the appropriate database bindings and change the following keys in the DATABASES 'default' item to match your database connection settings:
  • ENGINE – Either 'django.db.backends.sqlite3', 'django.db.backends.postgresql', 'django.db.backends.mysql', or 'django.db.backends.oracle'. Other backends are also available.
  • NAME – The name of your database. If you’re using SQLite, the database will be a file on your computer; in that case, NAME should be the full absolute path, including filename, of that file. The default value, os.path.join(BASE_DIR, 'db.sqlite3'), will store the file in your project directory.
If you are not using SQLite as your database, additional settings such as USER, PASSWORD, and HOST must be added. For more details, see the reference documentation for DATABASES.
For databases other than SQLite
If you’re using a database besides SQLite, make sure you’ve created a database by this point. Do that with “CREATE DATABASE database_name;” within your database’s interactive prompt.
Also make sure that the database user provided in mysite/settings.py has “create database” privileges. This allows automatic creation of a test database which will be needed in a later tutorial.
If you’re using SQLite, you don’t need to create anything beforehand - the database file will be created automatically when it is needed.
While you’re editing mysite/settings.py, set TIME_ZONE to your time zone.
Also, note the INSTALLED_APPS setting at the top of the file. That holds the names of all Django applications that are activated in this Django instance. Apps can be used in multiple projects, and you can package and distribute them for use by others in their projects.
By default, INSTALLED_APPS contains the following apps, all of which come with Django:
  • django.contrib.admin – The admin site. You’ll use it shortly.
  • django.contrib.auth – An authentication system.
  • django.contrib.contenttypes – A framework for content types.
  • django.contrib.sessions – A session framework.
  • django.contrib.messages – A messaging framework.
  • django.contrib.staticfiles – A framework for managing static files.
These applications are included by default as a convenience for the common case.
Some of these applications make use of at least one database table, though, so we need to create the tables in the database before we can use them. To do that, run the following command:
$ python manage.py migrate
The migrate command looks at the INSTALLED_APPS setting and creates any necessary database tables according to the database settings in your mysite/settings.py file and the database migrations shipped with the app (we’ll cover those later). You’ll see a message for each migration it applies. If you’re interested, run the command-line client for your database and type \dt (PostgreSQL), SHOW TABLES; (MySQL), .schema (SQLite), or SELECT TABLE_NAME FROM USER_TABLES; (Oracle) to display the tables Django created.
For the minimalists
Like we said above, the default applications are included for the common case, but not everybody needs them. If you don’t need any or all of them, feel free to comment-out or delete the appropriate line(s) from INSTALLED_APPS before running migrate. The migrate command will only run migrations for apps in INSTALLED_APPS.

Creating models

Now we’ll define your models – essentially, your database layout, with additional metadata.
Philosophy
A model is the single, definitive source of truth about your data. It contains the essential fields and behaviors of the data you’re storing. Django follows the DRY Principle. The goal is to define your data model in one place and automatically derive things from it.
This includes the migrations - unlike in Ruby On Rails, for example, migrations are entirely derived from your models file, and are essentially just a history that Django can roll through to update your database schema to match your current models.
In our simple poll app, we’ll create two models: Question and Choice. A Question has a question and a publication date. A Choice has two fields: the text of the choice and a vote tally. Each Choice is associated with a Question.
These concepts are represented by simple Python classes. Edit the polls/models.py file so it looks like this:
polls/models.py
from django.db import models


class Question(models.Model):
    question_text = models.CharField(max_length=200)
    pub_date = models.DateTimeField('date published')


class Choice(models.Model):
    question = models.ForeignKey(Question, on_delete=models.CASCADE)
    choice_text = models.CharField(max_length=200)
    votes = models.IntegerField(default=0)
The code is straightforward. Each model is represented by a class that subclasses django.db.models.Model. Each model has a number of class variables, each of which represents a database field in the model.
Each field is represented by an instance of a Field class – e.g., CharField for character fields and DateTimeField for datetimes. This tells Django what type of data each field holds.
The name of each Field instance (e.g. question_text or pub_date) is the field’s name, in machine-friendly format. You’ll use this value in your Python code, and your database will use it as the column name.
You can use an optional first positional argument to a Field to designate a human-readable name. That’s used in a couple of introspective parts of Django, and it doubles as documentation. If this field isn’t provided, Django will use the machine-readable name. In this example, we’ve only defined a human-readable name for Question.pub_date. For all other fields in this model, the field’s machine-readable name will suffice as its human-readable name.
Some Field classes have required arguments. CharField, for example, requires that you give it a max_length. That’s used not only in the database schema, but in validation, as we’ll soon see.
A Field can also have various optional arguments; in this case, we’ve set the default value of votes to 0.
Finally, note a relationship is defined, using ForeignKey. That tells Django each Choice is related to a single Question. Django supports all the common database relationships: many-to-one, many-to-many, and one-to-one.

Activating models

That small bit of model code gives Django a lot of information. With it, Django is able to:
  • Create a database schema (CREATE TABLE statements) for this app.
  • Create a Python database-access API for accessing Question and Choice objects.
But first we need to tell our project that the polls app is installed.
Philosophy
Django apps are “pluggable”: You can use an app in multiple projects, and you can distribute apps, because they don’t have to be tied to a given Django installation.
Edit the mysite/settings.py file again, and change the INSTALLED_APPS setting to include the string 'polls.apps.PollsConfig'. It’ll look like this:
mysite/settings.py
INSTALLED_APPS = [
    'polls.apps.PollsConfig',
    'django.contrib.admin',
    'django.contrib.auth',
    'django.contrib.contenttypes',
    'django.contrib.sessions',
    'django.contrib.messages',
    'django.contrib.staticfiles',
]
Now Django knows to include the polls app. Let’s run another command:
$ python manage.py makemigrations polls
You should see something similar to the following:
Migrations for 'polls':
  polls/migrations/0001_initial.py:
    - Create model Choice
    - Create model Question
    - Add field question to choice
By running makemigrations, you’re telling Django that you’ve made some changes to your models (in this case, you’ve made new ones) and that you’d like the changes to be stored as a migration.
Migrations are how Django stores changes to your models (and thus your database schema) - they’re just files on disk. You can read the migration for your new model if you like; it’s the file polls/migrations/0001_initial.py. Don’t worry, you’re not expected to read them every time Django makes one, but they’re designed to be human-editable in case you want to manually tweak how Django changes things.
There’s a command that will run the migrations for you and manage your database schema automatically - that’s called migrate, and we’ll come to it in a moment - but first, let’s see what SQL that migration would run. The sqlmigrate command takes migration names and returns their SQL:
$ python manage.py sqlmigrate polls 0001
You should see something similar to the following (we’ve reformatted it for readability):
BEGIN;
--
-- Create model Choice
--
CREATE TABLE "polls_choice" (
    "id" serial NOT NULL PRIMARY KEY,
    "choice_text" varchar(200) NOT NULL,
    "votes" integer NOT NULL
);
--
-- Create model Question
--
CREATE TABLE "polls_question" (
    "id" serial NOT NULL PRIMARY KEY,
    "question_text" varchar(200) NOT NULL,
    "pub_date" timestamp with time zone NOT NULL
);
--
-- Add field question to choice
--
ALTER TABLE "polls_choice" ADD COLUMN "question_id" integer NOT NULL;
ALTER TABLE "polls_choice" ALTER COLUMN "question_id" DROP DEFAULT;
CREATE INDEX "polls_choice_7aa0f6ee" ON "polls_choice" ("question_id");
ALTER TABLE "polls_choice"
  ADD CONSTRAINT "polls_choice_question_id_246c99a640fbbd72_fk_polls_question_id"
    FOREIGN KEY ("question_id")
    REFERENCES "polls_question" ("id")
    DEFERRABLE INITIALLY DEFERRED;

COMMIT;
Note the following:
  • The exact output will vary depending on the database you are using. The example above is generated for PostgreSQL.
  • Table names are automatically generated by combining the name of the app (polls) and the lowercase name of the model – question and choice. (You can override this behavior.)
  • Primary keys (IDs) are added automatically. (You can override this, too.)
  • By convention, Django appends "_id" to the foreign key field name. (Yes, you can override this, as well.)
  • The foreign key relationship is made explicit by a FOREIGN KEY constraint. Don’t worry about the DEFERRABLE parts; that’s just telling PostgreSQL to not enforce the foreign key until the end of the transaction.
  • It’s tailored to the database you’re using, so database-specific field types such as auto_increment (MySQL), serial (PostgreSQL), or integer primary key autoincrement (SQLite) are handled for you automatically. Same goes for the quoting of field names – e.g., using double quotes or single quotes.
  • The sqlmigrate command doesn’t actually run the migration on your database - it just prints it to the screen so that you can see what SQL Django thinks is required. It’s useful for checking what Django is going to do or if you have database administrators who require SQL scripts for changes.
If you’re interested, you can also run python manage.py check; this checks for any problems in your project without making migrations or touching the database.
Now, run migrate again to create those model tables in your database:
$ python manage.py migrate
Operations to perform:
  Apply all migrations: admin, auth, contenttypes, polls, sessions
Running migrations:
  Rendering model states... DONE
  Applying polls.0001_initial... OK
The migrate command takes all the migrations that haven’t been applied (Django tracks which ones are applied using a special table in your database called django_migrations) and runs them against your database - essentially, synchronizing the changes you made to your models with the schema in the database.
Migrations are very powerful and let you change your models over time, as you develop your project, without the need to delete your database or tables and make new ones - it specializes in upgrading your database live, without losing data. We’ll cover them in more depth in a later part of the tutorial, but for now, remember the three-step guide to making model changes:
  • Change your models (in models.py).
  • Run python manage.py makemigrations to create migrations for those changes
  • Run python manage.py migrate to apply those changes to the database.
The reason that there are separate commands to make and apply migrations is because you’ll commit migrations to your version control system and ship them with your app; they not only make your development easier, they’re also useable by other developers and in production.
Read the django-admin documentation for full information on what the manage.py utility can do.

Playing with the API

Now, let’s hop into the interactive Python shell and play around with the free API Django gives you. To invoke the Python shell, use this command:
$ python manage.py shell
We’re using this instead of simply typing “python”, because manage.py sets the DJANGO_SETTINGS_MODULE environment variable, which gives Django the Python import path to your mysite/settings.py file.
Bypassing manage.py
If you’d rather not use manage.py, no problem. Just set the DJANGO_SETTINGS_MODULE environment variable to mysite.settings, start a plain Python shell, and set up Django:
>>> import django
>>> django.setup()
If this raises an AttributeError, you’re probably using a version of Django that doesn’t match this tutorial version. You’ll want to either switch to the older tutorial or the newer Django version.
You must run python from the same directory manage.py is in, or ensure that directory is on the Python path, so that import mysite works.
For more information on all of this, see the django-admin documentation.
Once you’re in the shell, explore the database API:
>>> from polls.models import Question, Choice   # Import the model classes we just wrote.

# No questions are in the system yet.
>>> Question.objects.all()
<QuerySet []>

# Create a new Question.
# Support for time zones is enabled in the default settings file, so
# Django expects a datetime with tzinfo for pub_date. Use timezone.now()
# instead of datetime.datetime.now() and it will do the right thing.
>>> from django.utils import timezone
>>> q = Question(question_text="What's new?", pub_date=timezone.now())

# Save the object into the database. You have to call save() explicitly.
>>> q.save()

# Now it has an ID. Note that this might say "1L" instead of "1", depending
# on which database you're using. That's no biggie; it just means your
# database backend prefers to return integers as Python long integer
# objects.
>>> q.id
1

# Access model field values via Python attributes.
>>> q.question_text
"What's new?"
>>> q.pub_date
datetime.datetime(2012, 2, 26, 13, 0, 0, 775217, tzinfo=<UTC>)

# Change values by changing the attributes, then calling save().
>>> q.question_text = "What's up?"
>>> q.save()

# objects.all() displays all the questions in the database.
>>> Question.objects.all()
<QuerySet [<Question: Question object>]>
Wait a minute. <Question: Question object> is, utterly, an unhelpful representation of this object. Let’s fix that by editing the Question model (in the polls/models.py file) and adding a __str__() method to both Question and Choice:
polls/models.py
from django.db import models
from django.utils.encoding import python_2_unicode_compatible

@python_2_unicode_compatible  # only if you need to support Python 2
class Question(models.Model):
    # ...
    def __str__(self):
        return self.question_text

@python_2_unicode_compatible  # only if you need to support Python 2
class Choice(models.Model):
    # ...
    def __str__(self):
        return self.choice_text
It’s important to add __str__() methods to your models, not only for your own convenience when dealing with the interactive prompt, but also because objects’ representations are used throughout Django’s automatically-generated admin.
Note these are normal Python methods. Let’s add a custom method, just for demonstration:
polls/models.py
import datetime

from django.db import models
from django.utils import timezone


class Question(models.Model):
    # ...
    def was_published_recently(self):
        return self.pub_date >= timezone.now() - datetime.timedelta(days=1)
Note the addition of import datetime and from django.utils import timezone, to reference Python’s standard datetime module and Django’s time-zone-related utilities in django.utils.timezone, respectively. If you aren’t familiar with time zone handling in Python, you can learn more in the time zone support docs.
Save these changes and start a new Python interactive shell by running python manage.py shell again:
>>> from polls.models import Question, Choice

# Make sure our __str__() addition worked.
>>> Question.objects.all()
<QuerySet [<Question: What's up?>]>

# Django provides a rich database lookup API that's entirely driven by
# keyword arguments.
>>> Question.objects.filter(id=1)
<QuerySet [<Question: What's up?>]>
>>> Question.objects.filter(question_text__startswith='What')
<QuerySet [<Question: What's up?>]>

# Get the question that was published this year.
>>> from django.utils import timezone
>>> current_year = timezone.now().year
>>> Question.objects.get(pub_date__year=current_year)
<Question: What's up?>

# Request an ID that doesn't exist, this will raise an exception.
>>> Question.objects.get(id=2)
Traceback (most recent call last):
    ...
DoesNotExist: Question matching query does not exist.

# Lookup by a primary key is the most common case, so Django provides a
# shortcut for primary-key exact lookups.
# The following is identical to Question.objects.get(id=1).
>>> Question.objects.get(pk=1)
<Question: What's up?>

# Make sure our custom method worked.
>>> q = Question.objects.get(pk=1)
>>> q.was_published_recently()
True

# Give the Question a couple of Choices. The create call constructs a new
# Choice object, does the INSERT statement, adds the choice to the set
# of available choices and returns the new Choice object. Django creates
# a set to hold the "other side" of a ForeignKey relation
# (e.g. a question's choice) which can be accessed via the API.
>>> q = Question.objects.get(pk=1)

# Display any choices from the related object set -- none so far.
>>> q.choice_set.all()
<QuerySet []>

# Create three choices.
>>> q.choice_set.create(choice_text='Not much', votes=0)
<Choice: Not much>
>>> q.choice_set.create(choice_text='The sky', votes=0)
<Choice: The sky>
>>> c = q.choice_set.create(choice_text='Just hacking again', votes=0)

# Choice objects have API access to their related Question objects.
>>> c.question
<Question: What's up?>

# And vice versa: Question objects get access to Choice objects.
>>> q.choice_set.all()
<QuerySet [<Choice: Not much>, <Choice: The sky>, <Choice: Just hacking again>]>
>>> q.choice_set.count()
3

# The API automatically follows relationships as far as you need.
# Use double underscores to separate relationships.
# This works as many levels deep as you want; there's no limit.
# Find all Choices for any question whose pub_date is in this year
# (reusing the 'current_year' variable we created above).
>>> Choice.objects.filter(question__pub_date__year=current_year)
<QuerySet [<Choice: Not much>, <Choice: The sky>, <Choice: Just hacking again>]>

# Let's delete one of the choices. Use delete() for that.
>>> c = q.choice_set.filter(choice_text__startswith='Just hacking')
>>> c.delete()
For more information on model relations, see Accessing related objects. For more on how to use double underscores to perform field lookups via the API, see Field lookups. For full details on the database API, see our Database API reference.

Introducing the Django Admin

Philosophy
Generating admin sites for your staff or clients to add, change, and delete content is tedious work that doesn’t require much creativity. For that reason, Django entirely automates creation of admin interfaces for models.
Django was written in a newsroom environment, with a very clear separation between “content publishers” and the “public” site. Site managers use the system to add news stories, events, sports scores, etc., and that content is displayed on the public site. Django solves the problem of creating a unified interface for site administrators to edit content.
The admin isn’t intended to be used by site visitors. It’s for site managers.

Creating an admin user

First we’ll need to create a user who can login to the admin site. Run the following command:
$ python manage.py createsuperuser
Enter your desired username and press enter.
Username: admin
You will then be prompted for your desired email address:
Email address: admin@example.com
The final step is to enter your password. You will be asked to enter your password twice, the second time as a confirmation of the first.
Password: **********
Password (again): *********
Superuser created successfully.

Start the development server

The Django admin site is activated by default. Let’s start the development server and explore it.
If the server is not running start it like so:
$ python manage.py runserver
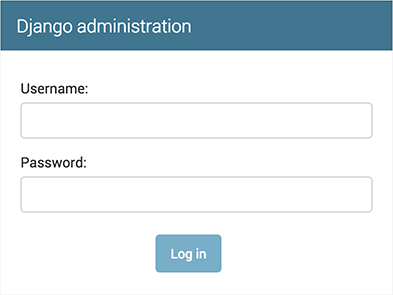
Now, open a Web browser and go to “/admin/” on your local domain – e.g., http://127.0.0.1:8000/admin/. You should see the admin’s login screen:
Django admin login screen Since translation is turned on by default, the login screen may be displayed in your own language, depending on your browser’s settings and if Django has a translation for this language.

Enter the admin site

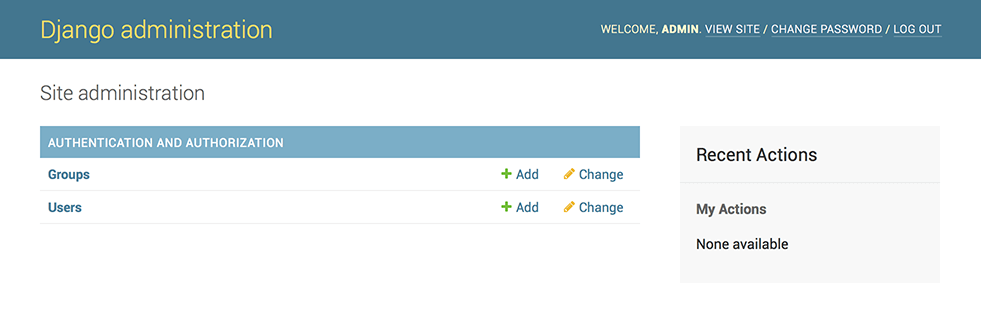
Now, try logging in with the superuser account you created in the previous step. You should see the Django admin index page:
Django admin index page You should see a few types of editable content: groups and users. They are provided by django.contrib.auth, the authentication framework shipped by Django.
Make the poll app modifiable in the admin

But where’s our poll app? It’s not displayed on the admin index page.
Just one thing to do: we need to tell the admin that Question objects have an admin interface. To do this, open the polls/admin.py file, and edit it to look like this:
polls/admin.py
from django.contrib import admin

from .models import Question

admin.site.register(Question)

Explore the free admin functionality

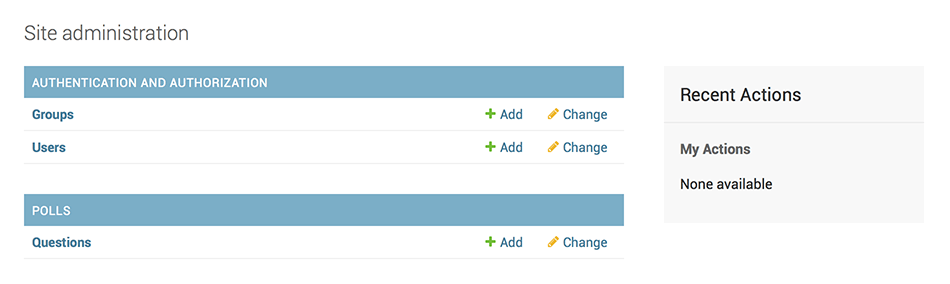
Now that we’ve registered Question, Django knows that it should be displayed on the admin index page:
Django admin index page, now with polls displayed Click “Questions”. Now you’re at the “change list” page for questions. This page displays all the questions in the database and lets you choose one to change it. There’s the “What’s up?” question we created earlier:
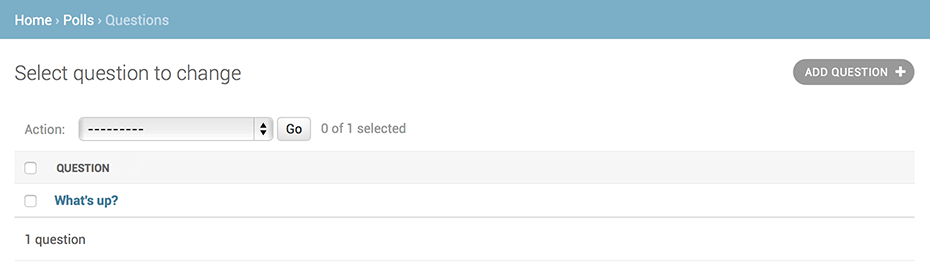
Polls change list page Click the “What’s up?” question to edit it:
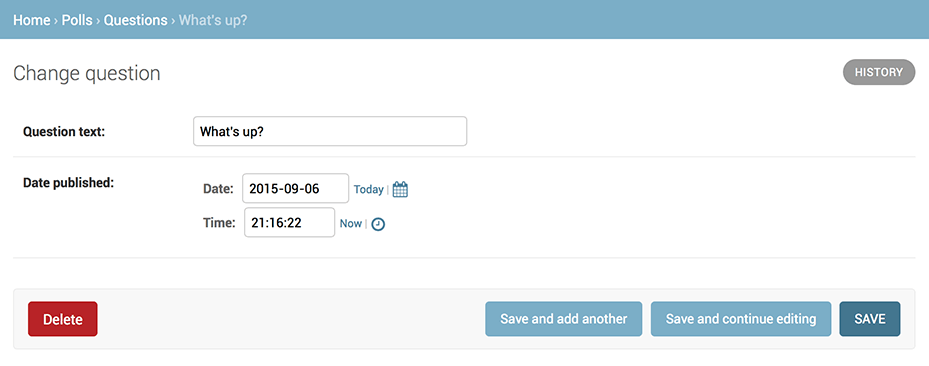
Editing form for question object Things to note here:
  • The form is automatically generated from the Question model.
  • The different model field types (DateTimeField, CharField) correspond to the appropriate HTML input widget. Each type of field knows how to display itself in the Django admin.
  • Each DateTimeField gets free JavaScript shortcuts. Dates get a “Today” shortcut and calendar popup, and times get a “Now” shortcut and a convenient popup that lists commonly entered times.
The bottom part of the page gives you a couple of options:
  • Save – Saves changes and returns to the change-list page for this type of object.
  • Save and continue editing – Saves changes and reloads the admin page for this object.
  • Save and add another – Saves changes and loads a new, blank form for this type of object.
  • Delete – Displays a delete confirmation page.
If the value of “Date published” doesn’t match the time when you created the question in Tutorial 1, it probably means you forgot to set the correct value for the TIME_ZONE setting. Change it, reload the page and check that the correct value appears.
Change the “Date published” by clicking the “Today” and “Now” shortcuts. Then click “Save and continue editing.” Then click “History” in the upper right. You’ll see a page listing all changes made to this object via the Django admin, with the timestamp and username of the person who made the change:
History page for question object When you’re comfortable with the models API and have familiarized yourself with the admin site, read part 3 of this tutorial to learn about how to add more views to our polls app.

Source : https://docs.djangoproject.com/en/1.10/intro/tutorial02/